[This article was originally published in June 2017 and has been updated and expanded.]
Many homeowners enjoy the challenge and pleasure of doing their own landscaping or home improvement projects. But can a stone patio be a DIY project?
When you find that your formerly lush backyard is becoming less than lush these days, or the upkeep is just too much, perhaps a patio is in order.

Stone Patio Installation: Is It a DIY Project?
The good news is that a professional looking stone patio is a home remodeling project within the grasp of even the least talented DIY enthusiast.
And the better news is that the installation of a well-built paver patio can provide significant resale value for your home.
The folks at HomeLight offered this insight into the ROI of patios,
A HomeLight survey of top agents estimated that a new patio costing $3,269 to construct would bring a $3,563 increase in value, or a 109% return on investment. More likely than not, you’ll recoup the costs of your patio and add value to your home in the process.
In addition, they noted that in a Fall 2021 HomeLight survey, agents reported that outdoor space was the third-most-prioritized feature for homebuyers.
And the possibilities and design ideas for stone patios is almost endless!
For example, the "stones" themselves come in several types that will have a determining impact on your design choices.
Flagstones, for example, are a popular choice, but these heavy, irregularly shaped and sized stones, tend to discourage installation by the novice DIY builder.
Other popular materials include bluestone, clay bricks, and even concrete. The last one, however, is not always in the wheelhouse of most casual DIY homeowner remodelers.
But the most common choice of patio building material - and perhaps the most DIY-friendly - are pavers which are made of natural stone, concrete, clay, and even recycled materials.
These various types of pavers are popular patio materials, in part because they are so easy to work with and can be laid in a variety of patterns, much like traditional bricks.
With the wide range of patio pavers that are available, both small and large, and the abundance of "how-to" videos online, there is little reason why most any homeowner can't opt for a new patio.
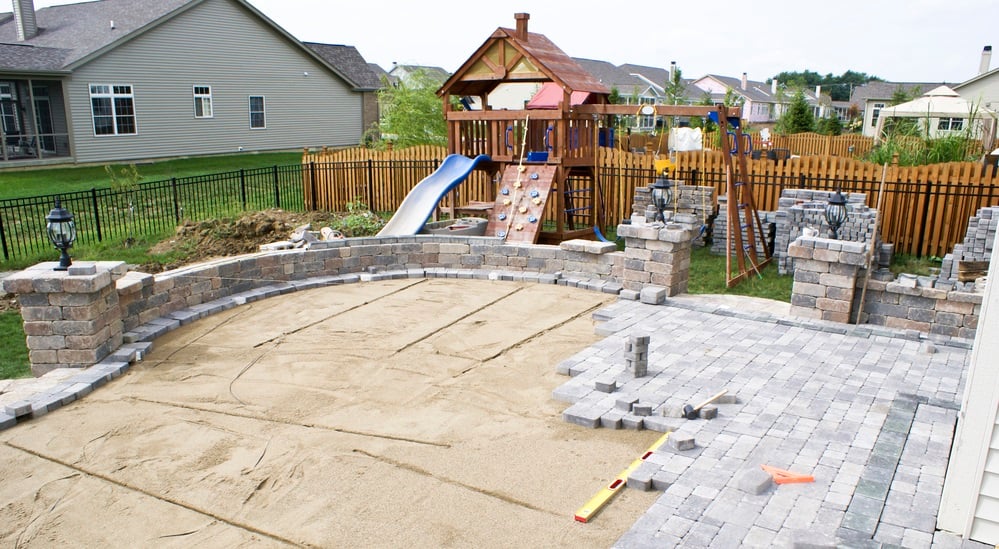
And for a dash of variety a small structure like a bench, or a short length of wall, can be added to greatly enhance the overall look of your project.
While each patio will be different - and half the fun is in the design process - almost every patio building project has the same foundation. Here is a high-level overview of what might required for just about any patio building project.

Eight Steps for a Beautiful DIY Patio Project
After you have settled on a design for your new patio you will need to buy your materials and have them delivered. Depending on the size of your finished project, you may want to have the materials delivered in stages so that you don't have stacks of paver stones blocking your driveway.
Now that you have your pavers, tools, gravel and sand, it's time to go to work:
1. Prepare the ground area for the patio
You will want to show the outline, or perimeter, of the patio area with marking paint. Once this is done you can place wooden stakes just outside of the perimeter and attach a mason line. This will be adjusted to guide the gradual slope of your pavers away from the house. This is important for draining water in the right direction. A good slope will have a drop-off of about 1 inch every 8 feet.
2. Clear away all the grass and loose soil
You will be dumping 4 inches of paver base and about 1 inch of paver sand into your dug out area before adding the paver stones. This means digging out an area approximately 7 inches deep. Now's the time to use the mason line you set up. Check the depth of your excavation against the mason line with a measuring tape. You will do this at numerous points to make sure you have the right depth and slope.
3. Add base for pavers
A special gravel called "Paver base" is used first. Paver base is a form of aggregate used in the construction of patios and walkways. Once it has filled your excavated area and been spread evenly, you will need to compact the area until you have a firm base. It's a good practice to then lightly wet the paver base to make it more solid.
4. Put in paver sand
While most any sand could probably be used, special fine-grained sand is preferred for pavers. The sand acts as a cushion for the pavers and is used at the end of construction to fill the paver joints. This binds the stones together and helps prevent the growth of weeds.
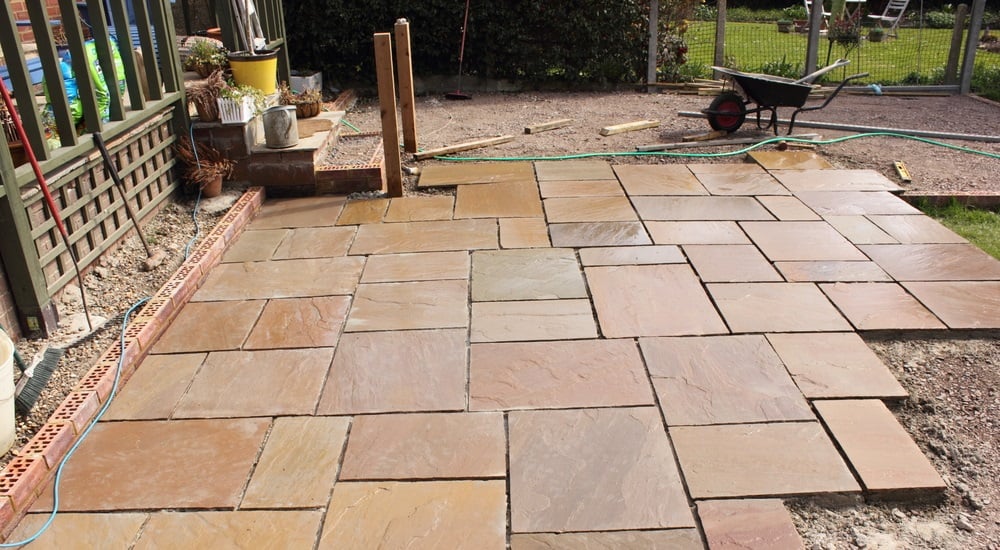
5. Position the paver stones
Most paver stone have "joints" - slight indentations that mate with ridges in each block. This allows for easy assembly and stronger fit and positioning. Start with a corner close to the house and work in an outward manner. Place them straight down into the sand, one at a time, and fit them snuggly together. Avoid dragging the pavers across the sand.
6. Cut any final pavers, as needed
You may find that as you get to the outermost edges of your patio, the remaining pavers will be too large to fit properly. Or if you have angles, circular border areas, etc. some stones will have to be cut. Renting a masonry saw is a good option for a clean cut, but a masonry blade installed on a standard circular saw can do the trick. Always wear gloves and eye protection when cutting pavers.
7. Add edging stones for perimeter
Something is needed to provide a solid edge to contain you paver stones. Edging stones are a great option. Again, as you run up against unusual corners, borders or shapes, your edging stones may need to be cut, as well. Your choice for edging material is not limited to the same stones you used for the pavers, either. Be creative.
8. Add sand and final tamp
After everything has been positioned and cleaned off, stakes and mason lines removed, and tools put away, it's time for the finishing touches. Throw or scatter paving sand across the surface of your newly laid patio so that the entire surface is covered. Using a push broom, sweep the sand into the gaps between the stones and then run a plate compactor across the patio surface. Repeat.
And now you have a beautiful new stone patio to enjoy for years with little maintenance. And, with the right materials and well-laid foundation, you can install a paver patio in about a day.

A Beautiful New Stone Patio and Piles of Yard Debris
There are few landscape additions that can have the visual impact and provide the sense of backyard elegance than a well-designed stone or paver patio.
And, in addition to the aesthetic appeal and ambience, a patio can greatly improve a the versatility and functionality of almost any backyard.
However, once the project is complete it is quite likely that you will end up with large piles and mounds of dirt, sod, paver rubble, trash, and various other types of yard debris.
And this all has to be hauled off and disposed of properly - and it is quite likely going to be far more debris than you'll ever fit into your trash bins.
The good news is that yard debris and waste removal does not have to be a Do It Yourself project! In fact, a simple call to Junk King means that all you need do make an appointment, sit back, and watch the pros do all the heavy lifting that you really don't need to do.

Get Professional Help With Your Debris Removal
Yard waste can come in many forms.
- Did you have a few year's worth of old cuttings or other debris spread across your yard?
- Have you recently started (or completed!) a gardening or landscaping project that’s left dirt and debris everywhere?
- Or do you simply have a bunch of junk and clutter in your yard that you haven’t had time to clean up?
Junk King provides an efficient, safe and eco-friendly yard waste removal service so you don’t need to worry about the pick up or disposal of your yard debris.
Unlike the backseat of your car, our junk removal trucks are made to handle those dirty yard debris items. Junk King's experienced debris removal team will break down and haul off any types of yard waste you have.
Our professional and insured yard waste removal team will show up at your home and we'll call 15 to 30 minutes before we arrive on site. Once there, we’ll give you a free estimate based on how much room your junk takes up in our truck.
You just point and we haul the debris into our junk removal trucks. And we do it all without any hidden fees!
Ready to get rid of DIY project yard waste? It’s as simple as 1, 2, 3.
You make an appointment with us by calling 1.888.888.JUNK (5865) or by simply booking online above.